I Used Squarespace Blueprint AI To Build a Website in Minutes
If you click to purchase a product or service based on our independent recommendations and impartial reviews, we may receive a commission. Learn more
Squarespace revealed its newly revamped AI website builder, Blueprint AI, during the Squarespace Refresh 2024 announcement. The five-step process lets you build a custom website from scratch by selecting pre-designed options and styles.
Having used Squarespace Blueprint when it came out last year, I couldn’t wait to test out this new – and apparently improved – version.
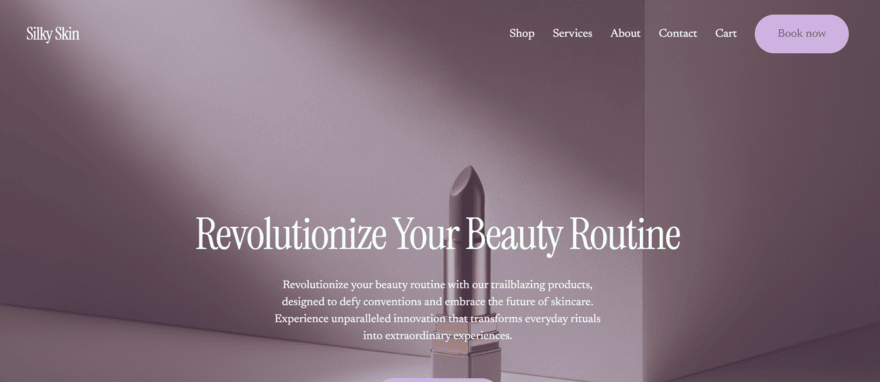
Above, you can see the site I made using Blueprint AI, and this guide will show you exactly how I made it step-by-step. I’ll explain more about Blueprint AI below and examine whether it’s worth using or not.
What Is Blueprint AI?
When you decide to build a website with Squarespace, you’ll be presented with two paths: pick a template or create your site using Blueprint AI. But what is Squarespace Blueprint AI?
Squarespace Refresh 2024 – an annual announcement from the website builder to reveal new products and updates – launched a refreshed look for the AI builder. It was previously known as Squarespace Blueprint, but Blueprint AI now takes note of your design choices and brand details before generating a personalized website.
The five-step process requires minimal effort from your end, simply asking you to select your preferred design combinations, whether that’s for your homepage or choosing the right color scheme.
You can get started with Squarespace Blueprint AI when you sign up for the 14-day free trial, or by subscribing to any of Squarespace’s pricing plans (ranging from $16 to $52 per month, billed annually). You can also get 10% off your chosen Squarespace plan with our code “WBE10”.
How To Use Squarespace Blueprint AI
The initial onboarding steps ask about your business type and what you want to do with your site. After that, you’ll be given the option to build with AI. Below, I’ll walk you through each step of building a website with Blueprint AI, from setting your site information to selecting a font.
If you want to see Blueprint AI in action first, you can watch my colleague Lucy walk you through the steps in this video tutorial:
1. Choose a Site Title and Brand Personality
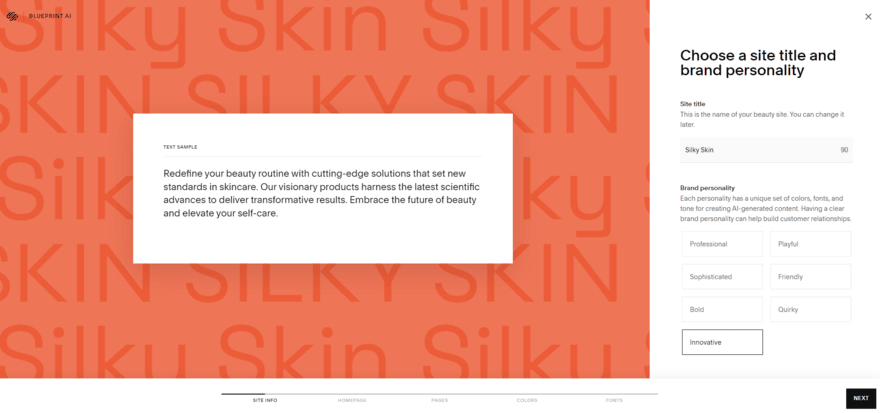
The first step of Blueprint AI is to give your site a name – simply enter your site’s title into the text box and ensure it fits within the 100-character limit.
Blueprint AI will also ask you to choose one of seven brand personalities: Professional, Playful, Sophisticated, Friendly, Bold, Quirky, and Innovative. These influence the AI-generated site profile, and the recommended color schemes, font types, and tone across your custom website.
From my testing, I was impressed by how much the text sample varied depending on which personality I clicked on. I chose the “Innovative” personality for my test beauty business because the sample fit my business the most.
Top tip 💡
When building with Blueprint AI, the brand personality you pick will depend on your business and website needs. For example, I’d recommend the Professional or Sophisticated personalities if you’re trying to build authority or expertise in your industry. Whereas, the Playful and Quirky personality types could be a good fit for a fun, modern brand.2. Build Your Homepage
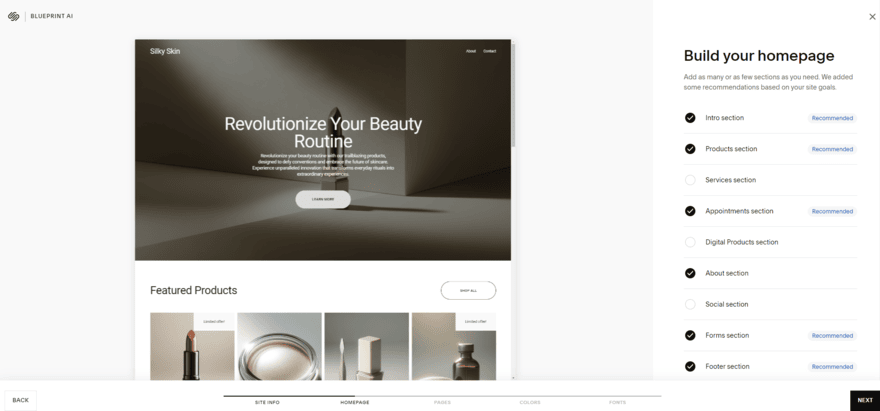
Step two focuses on building a homepage. I could choose from nine pre-designed options, such as an About section and an Appointments section. These are populated with images and text to match my site info from the step before. For example, the Intro section I added included a large image of makeup and a headline to match my skincare/beauty business.
I appreciated Blueprint AI recommending certain options over others, based on what it deemed important for my site – as shown in the image above. But, ultimately, I had complete control over what sections to include and what to leave out.
Each section also has multiple layout options so you can choose a design you like the best – the Layout Switcher tool lets you swap through the different designs at the click of a button.
3. Add Pages to Your Site
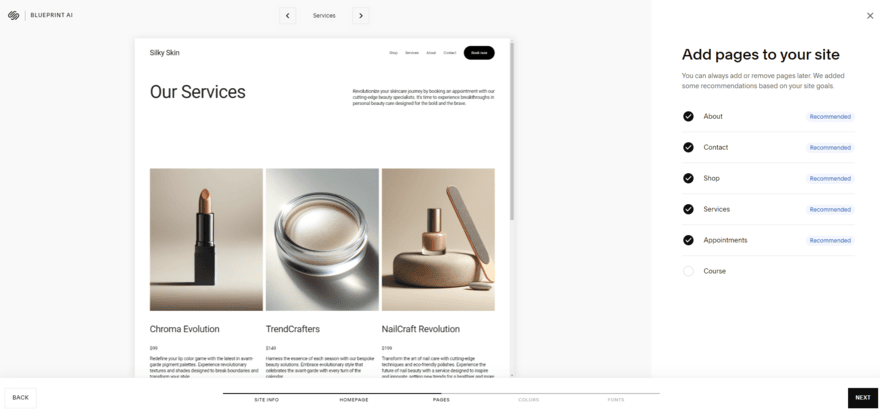
Once I was happy with my homepage, Blueprint AI then wanted me to select pages to add to my site. Again, like the previous step, I had pre-designed page options to choose from that matched my site profile.
There are six page types: About, Contact, Shop, Services, Appointments, and Course. For my site needs, Squarespace recommended I pick all of these apart from the Course page. The arrow buttons at the top of the screen let me preview the pages to help with the selection process.
While these pages are already populated with content and images, everything can be edited in Squarespace’s editor after the AI builder has done its work. At this stage, the pages are basic and only feature the necessary elements. For example, the Contact page features a contact form and that’s it.
While Blueprint AI aims to get you online quickly, which is why the builder keeps things simple, I recommend making those extra customizations in the editor before you publish your site to elevate the raw AI designs. Otherwise, your website might end up looking similar to others being made in the same way.
4. Choose a Color Palette
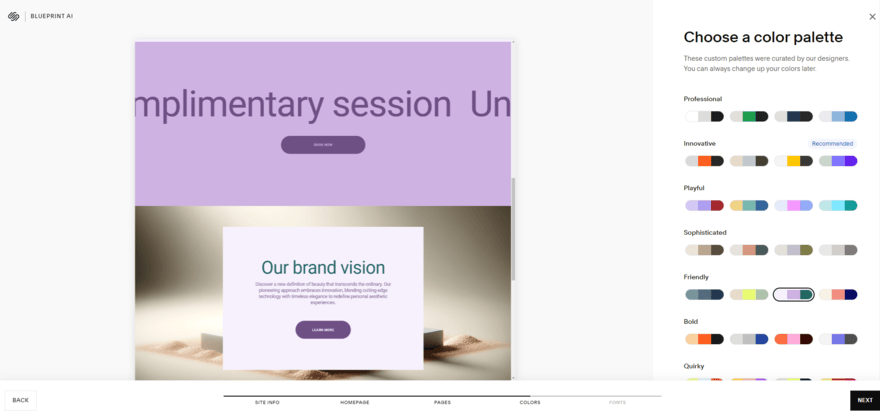
Step four is where things get colorful – literally. Blueprint AI provides dozens of curated color palettes to choose from. These are broken down by the brand personalities listed in the first stage, with each personality featuring four different color schemes.
Blueprint AI suggested I choose one of the “Innovative” color palettes to match my earlier decisions. Thankfully, there are quite a few options, so I didn’t have any trouble finding one for my site. And, it’s easy to preview the different styles – clicking on a different palette will change the look of the homepage preview to the left of the screen.
Like all previous design choices, your chosen color scheme isn’t fixed – you can only add custom color schemes in the editor after Blueprint AI has generated your template.
5. Choose a Font Pairing
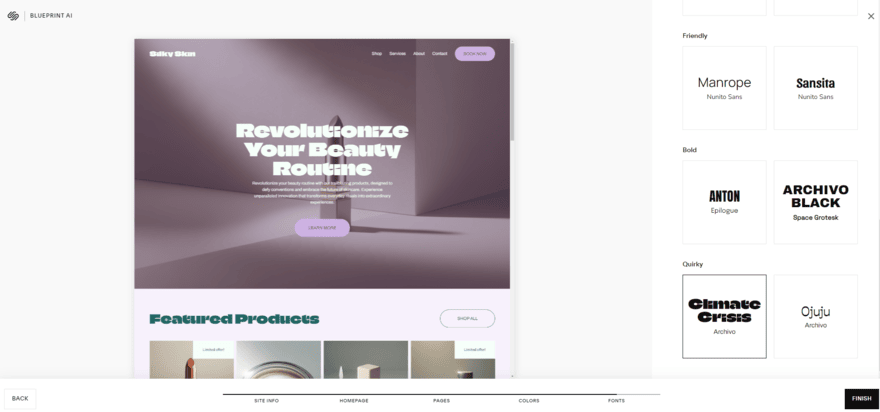
The final Blueprint AI step is to choose a font type for your website. Like the color palettes, these pairings have been designed by Squarespace’s experts and align with the seven brand personalities.
Each personality has two font suggestions – in total, there are 14 fonts to pick from. This gives you a good range to choose from, without overwhelming you with options and slowing down the speedy AI building process.
I could click each font option to refresh my site preview, giving me a clear look at what my site would look like at the end of the process. I was happy to see a good range of font types, from professional-looking styles to trendy, modern styles.
Top tip 💡
It’s important to choose the right font for your website. Blueprint AI suggests stylish font types, deploying the font across your site and pages in one click. And, although you can edit your text directly once in the Squarespace editor, it’s best to avoid rolling out too many font types. This can make your site look messy and inconsistent. Plus, you run the risk of making your content unreadable if you choose a really wacky font. I recommend sticking to the suggestions provided by Squarespace to keep your site accessible.6. Click Finish
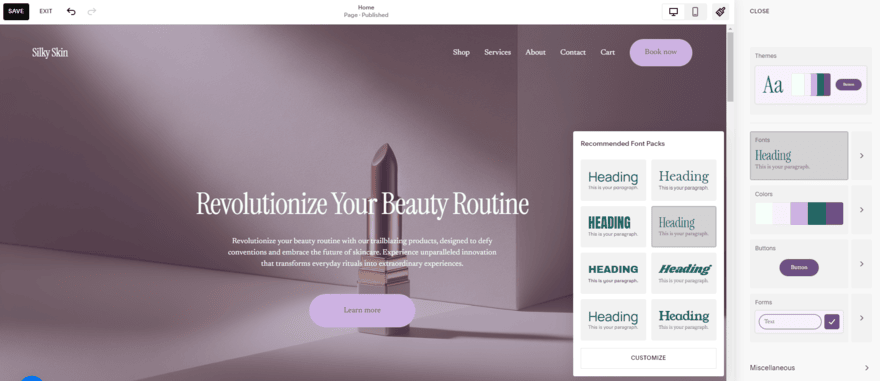
After completing the five steps set by Blueprint AI, I clicked “Finish” to lock in my chosen components and designs. In just a few seconds, my generated template was ready to go and I was sent to my Squarespace account so I could start tweaking my settings or editing my site.
I was very happy with the final result and didn’t have much to edit afterward. It simplified the design process, and with a few checks, I could easily publish my site immediately. That said, I recommend replacing the imagery with unique visuals, and adding fresh copy here and there to make your site your own.
All in all, with me clicking through every option and spending some time to make my site look nice, it took me under 10 minutes to set up my website with Blueprint AI.
Do I Recommend Using Blueprint AI?
Yes, after using it myself, I would recommend Blueprint AI to all Squarespace users. It’s especially useful for professionals who lack confidence when it comes to designing a site, and it’ll save business owners time which they can spend on other tasks instead.
Squarespace is the easiest website builder we’ve tested in 2024, and the newly improved Blueprint AI contributes towards its beginner-friendly nature. By offering curated components and styles, Squarespace Blueprint AI takes away the hassle when designing a site and gets you online quickly.
With just a handful of clicks and a few minutes of your time, you can create a cohesive site for your brand. Plus, you won’t need to worry about understanding the editor right away since Blueprint AI simplifies the whole process for you.
If you want to try Blueprint AI for yourself, then you can use Squarespace’s 14-day free trial to build your site from scratch – keep this guide open as you go through the process, and let us know how you get on.
Leave a comment