How to Move a WordPress Site to a New Host
If you click to purchase a product or service based on our independent recommendations and impartial reviews, we may receive a commission. Learn more
There’s no shortage of reasons to want to move your WordPress site to a new hosting account. If you’re using the latest WordPress version (6.3), it makes sense that you’ll want an up-to-date web hosting provider, too. Whether it’s stronger uptime, faster speeds, cheaper plans, or better customer service, it makes sense to switch to a provider that has what you want. But we know that switch can sometimes feel like a risky move or a lot of work.
The good news is, it doesn’t have to be! We’ll break down the WordPress migration process step-by-step, so you can avoid any time-consuming snares.
How to Migrate a WordPress Website
- Sign up to a new host
- Back up your website’s files
- Export your database from your existing host
- Create a MySQL database on your new host
- Edit the wp-config.php file on your website’s files
- Import your saved database into your new host
- Upload your website’s files to your new host
- Update your DNS settings
- Handle any troubleshooting
- How to test your WordPress site after migration
Now, let’s take it one step at a time!
1. Sign Up To a New Host
Before you can actually move your WordPress website from one server to another, you need to choose your new hosting provider and sign up to a plan with them.
Which Host Should I Transfer My WordPress Site To?
You may have already picked out your new hosting provider – in which case you can skip to the next step. But if you’re not sure which host to switch to, then it’s best to identify your top priority, and then research providers who excel in that area.
For example, if you’re unsatisfied with your current provider’s uptime, then you might want to choose your new provider based on high uptime percentages. Or if you’re tired of paying a certain amount of money, you could choose a more affordable host (we’ve written a guide to the cheapest WordPress hosts for just that purpose).
You can even choose between providers that will take care of WordPress migration for you – which brings us to…
Which Providers Will Move My WordPress Site For Me?
Bluehost, DreamHost, and A2 Hosting.
We’ve included a quick snapshot of each provider’s ratings below, but you can click on the “Learn More” drop-down bars if you want to take a closer look!
Bluehost
Bluehost is the #1 overall provider in our hosting rankings, partly due to its great uptime and customer service. It’s also an officially recommended provider by WordPress itself. Bluehost’s WordPress plans start at $2.95/month.
Bluehost offers free migration for most WordPress users. Once you’ve signed up for a plan, you can fill out a free migration contact form from your Bluehost dashboard. Bluehost’s team of migration experts will then contact you to review your WordPress website, and determine whether it’s eligible for free migration based on factors like website size, database size, current secure plugins, and PHP version.
If your site is one of the unique cases that doesn’t qualify for free Bluehost migration, then you can utilize Bluehost’s paid migration service, which will provide a more customized experience for $149.99.
DreamHost
DreamHost is known for its generous storage space and variety of hosting plans. WordPress plans start at $2.59/month.
DreamHost offers its own free, automated migration plugin to migrate your site with no downtime. Free migration is included with any of DreamHost’s WordPress hosting plans (these also start at $2.59/month).
DreamHost offers informative videos and walkthroughs to explain the migration process, but truthfully, you won’t need them. Migrating a WordPress site to DreamHost can be done in a few simple clicks.
A2 Hosting
A2 Hosting excels in security and customer support. If these are your most important factors, then look no further. But if uptime is more important to you, then you’ll want to consider Bluehost or DreamHost instead – A2 Hosting’s uptime guarantee is just 99.90%. Shared WordPress plans start at $2.99/month, while managed WordPress plans start at $11.99/month.
A2 Hosting offers free WordPress migration with 24/7 support from its dedicated Migration Specialist team. Once you’ve signed up for a hosting plan, you can contact A2 Hosting’s general “Guru Crew” support team to request a free migration. Most WordPress migrations with A2 Hosting don’t take longer than 24-48 hours.
Top Tip:
If you’re still undecided on which hosting provider to choose, it helps to identify your top priority and choose the host that does that best. For example, GoDaddy is best for server response times, while Hostinger is great for ecommerce hosting.Still undecided? Check out our ranking of the overall Best WordPress Hosts for more information.
2. Back Up Your Website's Files
Once you know which host you’d like to switch to, it’s time to start preparing to move your WordPress site!
First things first: it’s incredibly important to back up all of your site’s files to your local computer, so that you don’t lose any of your hard work. This applies to everyone, even if your new hosting provider is moving your site for you, because backups are an important safety measure regardless.
There are two main ways to conduct these backups: using a file transfer protocol, or using a WordPress plugin. Using a plugin is easier, but familiarizing yourself with file transfer protocols now will help in step seven, when it’s time to upload these files to your new hosting account.
Using File Transfer Protocol
A file transfer protocol (FTP) is a tool that enables you to – you guessed it – transfer files between your old hosting account and your local computer, by establishing a connection between the server and the computer. Popular FTP programs include Transmit for Macs and FileZilla for PCs.
Once you’ve installed an FTP program, you’ll need to use a Secure Shell FTP (SFTP) credential from your old hosting account to connect to the server and access your files. Once you’ve connected, you can select and download all of the files under your website’s directory.
Using Plugins
Plugins are an easier way to back up your WordPress site. You can install a WordPress plugin with a few clicks, and then use its settings to manage which files you want to back up, how often backups should happen, and where your files will be stored.
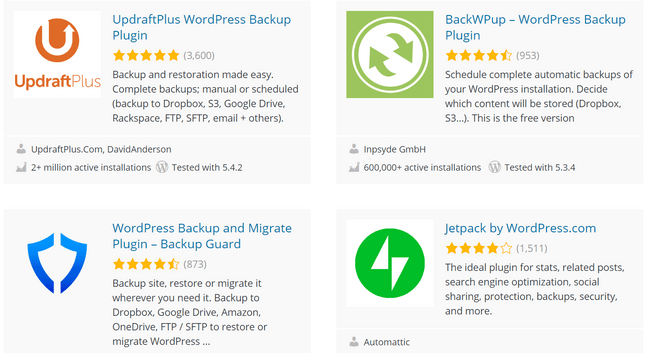
WordPress offers over 57,000 plugins, and of those, plenty were created to assist with backups.

There are tons of options – but make sure you choose a plugin that will back up and restore your site, meaning you’ll be able to revert your WordPress website to any of its previously saved versions (just in case). Out of the options above, we’d go with one of the plugins on the left, since they both mention restoration in their descriptions.
Want to go the extra mile? Check out our full guide to securing your website for more tips.
Top Tip:
If you decide to transfer your WordPress site to a host with assisted migration, there’s no need to read on – they’ll take care of the next steps for you! That’s ow easy they make it! But if you’d prefer to take care of your WordPress migration yourself, then let’s get into the good stuff…3. Export Your Database From Your Existing Host
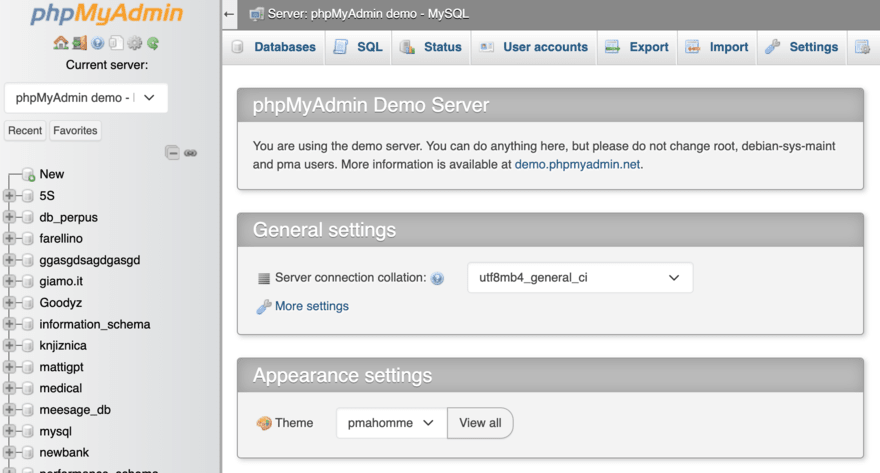
Exporting your database is a simple process, and usually takes place through phpMyAdmin, an administration tool for MySQL databases.
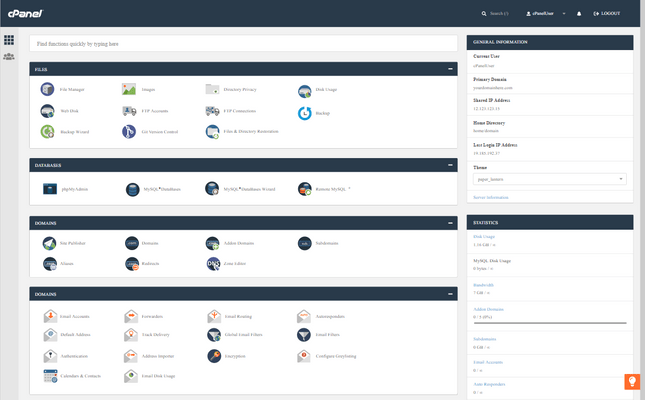
First, you’ll need to log into the control panel of your existing hosting account (the one you’d like to switch from). Most hosting providers use the cPanel control panel, which we’re going to use in this example. If you have a different control panel, like Plesk or vDeck, then your current hosting provider can help you if any of the steps differ from the below – but most control panels will operate very similarly.
In your cPanel control panel, open the phpMyAdmin tool in the “Databases” section.

Then, from the left hand side of the tool page, select the database you want to export. A new page will load, showing the structure of the database. At the top of this page, select the “Export” tab. You’ll then be able to choose between “Quick” or “Custom” export methods.
Whichever export method you choose, a download window will then pop up and let you save the exported database as a file on your local computer.
Top Tip:
Make sure to save the database to your local computer first so that you don’t lose any files!4. Create a MySQL Database on Your New Host
Now that you have a copy of your database saved, it’s time to create a new home for all of those files, and assign a user to oversee it. From the cPanel of your new hosting account (with the provider you’ve switched to), click on “MySQL Databases” in the “Databases” section.
Top Tip:
phpMyAdmin is great for importing and exporting databases, but don’t use it to create databases or database users. phpMyAdmin doesn’t map databases, which interferes with backups and restorations.From there, you can name your new database, and it will appear in the “Current Databases” table of your cPanel account. Then, under “Add User to Database,” select the user that you want to add from the User list box, and select the new database from the Database list box. You can then grant the user specific privileges, or select the “All Privileges” check box to grant the user all permissions to the database. Once this is done, click “Make Changes,” and cPanel will add the user to the new database.
5. Edit the wp-config.php File on Your Website’s Files
Once you’ve created the database on your new hosting account, you can import the old database files that you’ve saved to your computer. But it’s important to edit the wp-config.php file on your local computer first, because it’s responsible for the connection between a WordPress website and its database.
When you first set up your WordPress site with your old host, the wp-config.php file was created based on that old information. To update this information, you’ll need the following details:
- Database name
- Database username
- Database password
- Database host
You’ll have all of this information after creating the database and user in the previous step.
You can find the wp-config.php file in the folder on your computer where you downloaded your old website files in step two. Open this file in a text editor to make the following three changes.
Top Tip:
Before you edit your wp-config.php file, make a copy of the old version so that you can restore it if anything goes wrong in the editing process.Change the Database Name
In the file, find the following line:

The db_name section of this line will be set to the database name of your old web host, and needs to be changed to the name of your new database.
Change the Database Username
Next, find this line:

And change the db_user section from the username of your old host to the new username you’ve created.
Change the Database User Password
Finally, locate this line in the text:

And change the db_pass section to the new user password you created in step four.
6. Import Your Saved Database Into Your New Host
To import your database, you can either use phpMyAdmin or the mysql command line program. We’re going to explain the phpMyAdmin option, because it’s easier to use.
From your cPanel dashboard, click phpMyAdmin under the “Databases” section.

The phpMyAdmin administration page will appear in a new window. On the left side of the admin page, select the database that you want to import the old file into, then click “Import.” Under “File to Import,” click “Browse,” and select the exported database file from your local computer.
Top Tip:
Name your exported file something clear and distinct, so that you don’t have trouble finding it at this stage.7. Upload Your Website’s Files to Your New Host
Now that your new database is imported, it’s time to upload the old files that you saved in step two.
Use your FTP program to connect to your new host, and find the folder where your WordPress website is going to be stored. From there, you can upload your files from your local computer, including the updated wp-config.php file.
Top Tip:
You’re almost there! But don’t delete these files from your local computer once the upload is complete – it’s best to have these on hand just in case!8. Update Your DNS Settings
Once your files are uploaded to your new host, you’ll need to update your domain’s Domain Name System (DNS) settings so that they point to the new server IP address. If you don’t do this, the DNS settings will still point to your old host.
Your domain name registrar will have all of the information necessary to complete this step, but note that it can take up to 48 hours for your domain to fully propagate. Avoid making any changes to your website during this period, because they’ll be made on the old version of the site!
Top Tip:
When this 48-hour period is up, you can delete your files and database from your old web host – but make sure you keep everything on your local computer as a safety precaution!Further information:
- What is DNS?
- What are the best domain name registrars?
- How much should a domain name cost?
9. Handle Any Troubleshooting
You likely won’t encounter any major problems when you migrate a WordPress site to a new host, but it still helps to be prepared just in case.
Here are a few things you can keep an eye on to prevent any issues down the line:
- Check your wp-config.php file. Make sure that the database connection information is correct.
- Check your DNS settings. Make sure that your domain is pointing to the correct web host.
- Check for broken links. You can use a plugin, like Broken Link Checker, to find and fix broken links on your site.
- Check your database. You can use a plugin like WP-DBManager to repair your database.
- Check your permissions. Make sure that your WordPress files and folders have the correct permissions.
You’ll also want to know how to restore your database from a backup, which involves importing the backup database you have saved to your local computer. You can do this by logging into phpMyAdmin and clicking on the “Databases” tab.

From there, you can click “Import” – also at the top of the screen – and fill out the required information fields. Under “Format,” you’ll want to select SQL. Then click “Go,” and phpMyAdmin will import your backup database!
Don’t stress too much about potential issues arising. If anything does come up, you’ll be able to use online tools and guides like this one to find a DIY fix. For example, our guide on Bluehost, DreamHost, or A2 Hosting to migrate your site means you’ll save time and money, since these providers will do it for free.But you don’t have to go the hands-off route, and if you’d rather move your WordPress site yourself, let’s recap the steps:
- Sign up to a new host – Choose your new provider based on what’s important to you.
- Back up your website’s files – Use a plugin or an FTP protocol to save your files.
- Export your database from your existing host – Begin the transferring process from the control panel of your old host.
- Create a MySQL database on your new host – Create a new home for your old files.
- Edit the wp-config.php file on your website’s files – Make sure the database information is up-to-date.
- Import your saved database into your new host – Upload your database.
- Upload your website’s files to your new host – Upload your files from your local computer.
- Update your DNS settings – Make sure your domain’s settings point to the new server IP address.
- Handle any troubleshooting – Be prepared in case issues arise.
- Test your WordPress site after migration – Make sure everything is up and running.
Once broken down, this process isn’t too difficult, either – just make sure to keep saving everything as you go![/vc_column_text]


8 comments